Thursday 28 August 2008

Biggest news of the year


No this really isn't another Nikon D90 post, I mean it is quite exciting news and all, if I had the cash I would jump ship to Nikon immediately, but I guess I will have to wait until Sony bring out their video enabled DSLR, it won't be long before everyone has one.

Anyway now that I have your attention, I though I would tell you about the news, that is more exciting to me than anything else. Joe McNally is writing his sequel to The Moment it Clicks. Its available for pre-order on amazon and will be shipping in Janary.

I had sat on this news and emailed Joe, hoping that he would tell me what the book would be about. He did in a way, as soon as he got back from china he posted a huge teaser on his blog.

The new book looks like its going to be a cracker, and its going to be about small camera flash, so it will provide a fix for you Xenon addicted photographers. Go read about it from the horse's mouth and pre-order your copy.

Friday 22 August 2008

Kaiser Hot Shoe Mod for Skyports or Pocket Wizards


This is a remix of a set I did on flickr a little while back to document a project to modify my kaiser hot shoe mounts for use with my Elinchrom Skyports but you could also use this for pocket wizards.

I hate using the PC connectors on my Flashgun because they often fall out. Also the little cables for the Skyport to a PC socket cost an arm and a leg. So I decided to modify some hot shoe adaptors I already owned. They cost less than the pocket wizard cables that you would need to connect up with, and its a more secure connection. Also I'd rather modify the shoe adaptor than the flashgun.

1. Kaiser Hot Shoe Adaptor
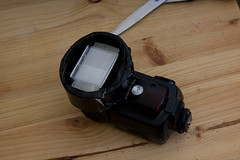
This little feller is quite useful, It has a PC connector on a cable and a tripod socket on the bottom. Its quite handy for mounting securely on brolly holders, but when I used it with my Elinchrom Skyports I used to leave the wire dangling free. Replacing the PC plug with as 3.5 mm phono jack would allow me to plug it straight into the skyport.


2. Funky but useless cable
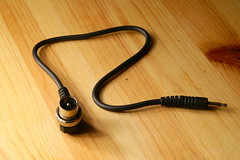
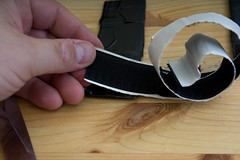
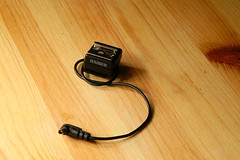
This funky but useless cable came with the skyport. Its useless for me, but the phono plug that goes into the skyport is useful so I'm having that.


3. Decapitation
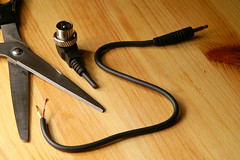
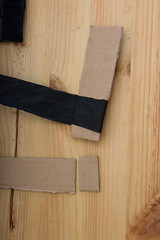
Take that useless cable, cut off the coax connector and keep that nice cable with the phono connector.

Flickr member Paul Chilly wrote in to say that you should cut the donor cable just above the strain relief, that way when complete, you can push the strain relief against the hot shoe, creating an even more professional result!


4. Unscrew you
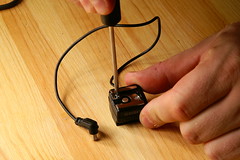
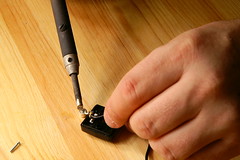
The Kaiser Hot Shoe thingy has 3 screws that you undo to take it apart. You need a teeny screwdriver. This picture shows you how to unscrew one screw, you work out how to do the other three.

If you are completely inept, you might want to put the screws into a jar so you don't lose them. I'm just saying...


5. Ironing
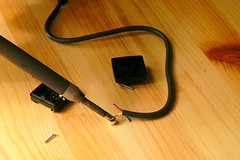
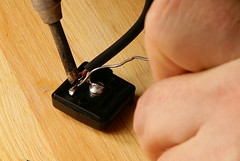
You are going to have to carefully remove the old wire. Its a good idea to pull out the central contact or you could melt the plastic. Just get your soldering iron nice and hot, Hold it over the places where the wires connect and gently pull apart.

This will take a little dexterity. Get an grown-up to help you.


6. New Cables PleaseOk so you have thrown away the old wire, now get the new one and solder it back in the position that the old ones was in. Don't stress about which wire goes where it doesn't really matter. Just make sure you get a good solder joint; that cable may have to take some strain.


7. Look at that rotten solder job
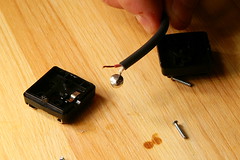
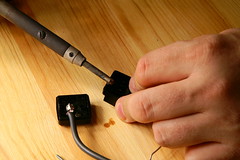
Ok so you've soldered the central contact onto the wire and burned a couple of circles in the table. Whoops!

Wait for it to cool down and fit it back in the plastic case. It will make it easier to solder the other wire.

Tell your partner the circles are knot holes...


8. This bit is really fiddlyWith one hand hold the solder, with the other hold the case and with your third hand hold the soldering iron. Fortunately I have 4 hands so I could use the camera as well, but you may want to get a consenting adult to help you.

Be very careful, with the second wire, you don't want to melt anything and you don't want any short circuits, but you do need a good strong joint.


9. Holy plastic batman!The cable might be too big for the hole, So carefuly melt it with the shaft of the soldering iron so that the hole gets bigger. No! not like that you idiot! I said the shaft, you don't want to get blobs of solder mixed in with the plastic.

You may find that melting the holes may make the case difficult to close, so you might need to scrape some of the excess plastic away from the inside edges with scissors or a sharp knife.


10. Ta-da! Finished
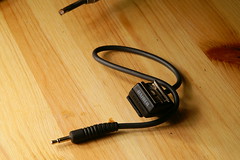
Now screw everything back together and you are done. One thing to watch out for is not to try and force the case closed as you could damage it. If you have difficulty closing it, then you should make sure that there are no protruding bits of plastic or insulation in the way.


11. Flash!
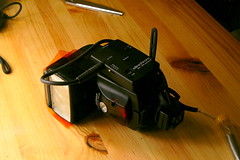
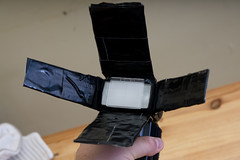
Here it is on the flashgun. The skyport is attached to the side with velcro, The foot of the flash now has that handy hole and it all connects nicely and very securely together. Its like a marriage made in heaven or in this case; North London.


Thursday 21 August 2008

No Shit


If you live or work London, you may be aware of The Photographer's Gallery in Great Newport street. Walking in there can be a bit random, sometimes you'll see beautiful photos of shit, and on occasion shit photos. The last exhibition or two haven't been to my taste at all, but I popped in this Luchtime and both galleries had some really interesting photos.

There are two exhibitions on. In number 5 there is an exhibition of Danny Treacy's work: Them. This has been fairly well publicised in the photography magazines and is well worth having a look at. Danny has scoured the land looking for discarded clothing and then re-fashioned them into outfits and photographed them on himself. The pictures in the magazines and on the net don't do them justice. In the gallery the prints are larger then life size and look pretty damn good.

After you have looked at "Them" and maybe had a tea and a cake in the gallery tuck shop, you might want to wander into number 8 and have a look at the exhibition: Fashion in the Mirror: This is a fairly broad collection of photographs from fashion photographers with luminaries like Avedon, Helmut Newton, Mario Testino and Steven Meisel. The Meisel work is layed out in a box down the centre of the gallery with the spread open pages of the magazine they were commisioned for, but there are also many fine prints on the walls. I was particularly pleased to see one of Harry Peccinoti's prints up large on the wall.

The exhibitions are only on until September the 14th so run down there now and take a look. You won't regret it. (Click on the images for more info)

Wednesday 20 August 2008

Barn Door Update and A Shooting


Last weekend I met up with fellow strobist, Gareth Dix, aka Cham128, at an undisclosed location to practice a bit of strobing. We didn't find Dick Cheney so we had to photograph each other. My model was okay but I didn't think much of his.

We were inspired by Nigel Parry's work to do some pretty hard contrast shots which required a lot of control of the light. I had brought my DIY barndoors and Gareth brought along the same brand of barn doors that were reviewed by David Hobby a while back. I was quite interested to see the difference between my ebay bought doors and Gareth's.

The first thing I noticed was that Gareth's was much smaller (his barn doors). In fact they weren't really much bigger than my DIY barn doors. The only problem was that they wouldn't fit on my SB28s. Maybe if they weren't covered in velcro they might have fitted, but we had to give up on them in the end. Secondly they were a lot less fiddly than the DIY barn doors. Fitted on Gareth's flash there was no problem using them with coloured gels, but the DIY barn doors were difficult to use with gels. I had to add velcro to the gels so I could stick the doors on. It wasn't elegant but it worked.

So provided that they fit your flash and you don't mind a little extra bulk, they aren't bad at all. But I guess where it starts to stack up is when you want a set for each flashgun. Thats where the DIY barn doors have an advantage, because you can split the doors across multiple flashes and they are physically smaller. I guess you could carry both in your bag.

The reason we needed the barn doors was to stop any spill from the background lights from contaminating the silhouette of the subject. What we were doing was lighting a 6x4 sheet of white polystyrene with two flash guns, using the barn doors to kill the spill. The subject in the foreground was lit with tight grid aimed to just light the face and nothing else. After we had tried some white background shots we put a red gel on the background light ( we only had one gel ) and got some iconic soviet style images. Finally we cleaned the dismembered corpses out of a wire cage and placed the cage between the background and the background flash to throw some dramatic shadows on the polystyrene. It was a good day.

Saturday 9 August 2008

How to make barn doors


If you saw my barn door review last week, you will have seen that I was uncomfortable with the size of the rig. If you are going to carry around something fragile and flimsy, why not make it portable and do double duty.

Given that my flash is covered in velcro for attaching gels, I thought it would be possible to create barn doors that can be attached directly to the flash. All I needed was a hinge mechanism that would allow the doors to be set in different positions.

I realised that it would be possible to create the barn doors using some stiff card for the door and cinefoil as a hinge. Cinefoil is heavy duty black aluminium foil use on film sets to make light modifiers, I had some handy, but you might be able to use stiff silver aluminium foil.

The neat thing about this design is that the DIY barn doors are stored flat, take up very little room in your bag and they don't all have to be attached to the one flash, so you could split them between two or more flashguns if you want to use them as flags.

1-barndoors
The first thing you need to do is cut some cardboard strips as wide as each side of your flashgun and about 4 or 5 inches long. You'll end up with two fat strips and two thin strips. Then cut them where your hinge is going to go. Its going to be about half an inch from the end so that you can fit some velcro to it. The image on the left shows the two thin side pieces.
3-barndoorsFor your next trick you will need to cut some strips of foil to wrap around the cardboard. I found that wrapping a two foot strip about an inch wide around the two pieces of the hinge gives enough stiffness to make it work nicely. The image on the right should give you an idea of what I mean. Then you can carefully wrap velcro around the whole thing to make it look like a sticky mess professional.


6-barndoors
Your final task is to add some velcro hooks onto the bottom of the door so that it can be attached to the flash. If you have done it all properly, the doors should bend at the hinge and stay put at whatever angle you set them to. If they don't then you probably should have used more foil.


7-barndoors
8-barndoors
The final result doesn't look too shabby and the individual doors can be removed if required. Because the doors aren't as wide as my ebay barn doors there isn't quite as much scope for producing a thin beam of light, but I quite like the light pattern it produces compared to the ebay doors and of course it is way cheaper and more portable than the ebay doors. It would be no hardship to keep a set in my camera bag. I think there is more tinkering that can be done with these. It might be possible to refine the shape of the doors to create wider beams or a double hinge to allow the doors to unfold to the same dimensions as the ebay doors. With something this cheap and easy to make, experimenting won't cost you a lot. Let me know if you have had a go and managed to improve on these doors.

Friday 1 August 2008

Barn Door Review


11-barndoorsI recently purchased some barn doors from an ebay seller. They came with a small honeycomb grid and a collection of gels. I haven't used them a great deal and I suspect that its quite unlikely that I will use them very often. The simple reason being that they take up too much space in my camera bag. Until I get myself a bag with wheels its extremely unlikely that I will take them on location at all. But I have used them in my kitchen to control light on a tabletop shot. However in order to do so I had to create a flash holder that it could attach to.


My first impression on opening the box was; wow! this looks so cool! But then when I tried to connect it with a flash head the excitement wore off. The head sits in the centre of a ring and four threaded bolts around the ring can be tightened to hold the flash in place, but an SB28 will only fit with the bolts in the corners, and none too securely. While attempting to secure the flash, I also discovered that the barn doors are quite flimsy. If you don't get the bolts evenly tightened all the way round the frame gets distorted and it becomes difficult to attach the grid or the gels. This isn't a big problem when you use a flash holder, but its still an annoyance.

14-barndoorsThe flash holder was pretty simple to make, just get a large cardboard tube that your flashhead will fit in. If you can't find one, then just order an A2 print from your online printers and you'll get one for free with it. Cut about an inch of tube, wrap it in gaffer tape or paint it black, then put some velcro hooks on the inside so that it will grab your furry flash head. Simple..


The barn doors themselves have quite primitive hinges, but I had no trouble setting them where I wanted and they were quite useful in controlling the light, but I did notice that there were some light leaks out of the sides.

Would I recommend them? Probably not. I think that if you didn't mind having them taking up space in your bag they could be a useful light modifier and they look pretty pro, but there are other more portable ways of producing similar effects. In fact I was inspired to create my own barn doors, and next week I will show you how.