 I have bought a new bit of kit, its a 180WS mains powered flash that I ordered from Hong Kong off of Ebay. I'm going to write a review of it, but before I do I would like to explain a bit about the background of this purchasing decision. Scroll down if you want to skip straight to the review.
I first got into artificial light when I joined The Camera Club in Kennington. Its a great little place, two well kitted out studios with Bowens flashguns, and a gallery space. I took a couple of lighting classes and then having learnt a little a rented the studio for a few solo sessions with some models I met off the internet. I was well and truly hooked, but the fact was, cheap as the studio was I couldn't afford to shoot very often even at £8 per hour. I wanted to get my own set of studio lights, but they were far too expensive for me to have my own set. So I headed down the Strobist route and bought a bunch of small flash guns and started shooting on location. It was liberating I could take them pretty much everywhere I went and wasn't tied to the mains. I missed the modelling lights and I missed the power, but not as much as I though I would.
I have bought a new bit of kit, its a 180WS mains powered flash that I ordered from Hong Kong off of Ebay. I'm going to write a review of it, but before I do I would like to explain a bit about the background of this purchasing decision. Scroll down if you want to skip straight to the review.
I first got into artificial light when I joined The Camera Club in Kennington. Its a great little place, two well kitted out studios with Bowens flashguns, and a gallery space. I took a couple of lighting classes and then having learnt a little a rented the studio for a few solo sessions with some models I met off the internet. I was well and truly hooked, but the fact was, cheap as the studio was I couldn't afford to shoot very often even at £8 per hour. I wanted to get my own set of studio lights, but they were far too expensive for me to have my own set. So I headed down the Strobist route and bought a bunch of small flash guns and started shooting on location. It was liberating I could take them pretty much everywhere I went and wasn't tied to the mains. I missed the modelling lights and I missed the power, but not as much as I though I would.
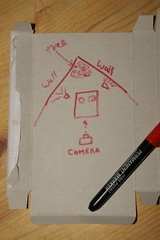
Fast forward to today, and I have been trying to do these tight snooted shots in a very dark space. This has given me two problems. One is that aiming the snoot accurately is difficult even when I have used an assistant. The second problem is that I didn't have enough light to focus accurately. So I have been thinking again that having studio flash would be quite handy. I also would like to try some lighting techniques using the modelling light that you can't do with strobes.
Jessops have been selling some low powered 180WS flashguns under the portaflash brand for some time. I'd always been a bit dismissive of these because of the low power. After all 180WS is not really much more powerful than a speedlight, having learnt the strobist way, I am now far more comfortable with low powered flashes and so these small mains powered flashes were starting to look a lot more desirable. You can get a two light kit from Jessops that represents reasonable value for money, but being a cheapskate I found someone on ebay selling the BA Wang GY180 Flash Light with a 60x60cm softbox for £51 including delivery, which was a hell of a lot cheaper than buying from Jessops. In fact a portaflash on its own is nearly double that. So temptation became a purchase and just a few short days later I had a new flash.
The flash and softbox arrived in two packages delivered by DHL and were adequately packed. Inside the box with the flash was a fair length power lead, a long sync lead and a bulb for the modelling light. The softbox consists of a huge speedring, a inner and outer diffuser a black outer cover and four spokes.
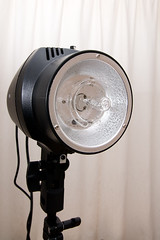
 The flashgun looks quite neat all in black. It has a hinged foot for attaching securely to a light stand. It has an umbrella holder built in at the base of the flash. The controls at the back are pretty easy to figure out. There is a power switch, a switch to turn the modelling light on, and a potentiometer (knob) to allow stepless power adjustment from full power down to 1/8th power. A flash ready light and a test button. Synchronisation can be achieved either using the built in slave or using the sync port which is rather sensibly a 3.5mm jack socket. The bulb for the modelling light extends rather alarmingly beyond the edge of the built in reflector, which means that it has to be removed for storage. This I feel is a bit of a design fault because these bulbs get very hot and don't take kindly to being touched with greasy fingers. It also means that the modelling light is going to throw light wider than the flash tube so what you see is not what you are going to get. The flash is missing features that you get in more expensive strobes, such as adjustable modelling power and a flash ready beep but for the price you pay for it you are going to expect it to be cheap and cheerful. The strobe casing doesn't have any mount points for light modifiers. Its completely smooth which did make me wonder how you were supposed to attach things to it.
I did some tests of the output from the flash and I was a little surprised to say the least. I knew that it was difficult to directly compare this sort of flash with a speedlight, but I wasn't expecting the output I was seeing. I set up the flash a reasonable working distance away from a light meter, about 5.5 feet and triggered it in the dark. It gave me a meter reading of f9.0 at full power. I set up an SB28 at the same distance zoomed to 85mm and took a reading of f20. That ,second hand SB28 speedlight, kicks out over two stops more light than the mains powered flash, you would need 4 GY180s to give the same light level as an SB28. Ok, so thats not a fair comparison as the mains flash has a wider beam than an SB28 at full beam. So I set the SB28 to 24mm and got a reading of f18 thats still two stops more than the GY180. However, once I had attached the softbox, with the inner diffusion panel, boht the GY1800 and the SB28 (at 24mm) were throwing out the same output. So you don't want to go getting one of these flashes if you want more power, unless you are always going to use an umbrella or a softbox. If you want to use a snoot or a small grid you are simply going to lose too much power. To me this flash seems so underpowered that I would question the claims of a guide number of 48, though they don't specify whether the guide number is in feet or metres and the measured output is closer to 48 in feet than 48 in Metres
As I mentioned before, the softbox comes with an enormous speedring, which was too large to fit on the front of the strobe. It actually had to be fitted around the main body of the strobe and didn't feel very secure. There were no instructions with the softbox and I'll admit being a bit puzzled at first as its not very intuitive. To put the softbox together you need to put the four spokes into holes in the speedring, Then the front diffuser has pockets on each corner to fit the ends of the spokes in. But to fit the spokes into the holes you need to bend them. It wasn't easy to do and I was worried that I was going to damage the spokes. Next take the black cover and attach the inner diffuser to the velcro tabs. Then fit the cover over the speedring and spokes and it velcros together with the edge of the front diffuser. Attaching the speedring to the strobe with the softbox fully assembled is tricky, but I can't see any other way of doing it. The flash slave didn't work with the softbox on, so triggering via the cable or a radio slave would be desirable.
Overall for £51 including postage for the flash and softbox its dirt cheap but if you don't need a modelling light, a speedlight is way more versatile and powerful. You also need to consider a few other things. Because of the modelling light, you can't put your own cardboard and plastic light modifiers on it because they could catch fire or melt, so you are going to have to spend money on decent modifiers, or figure a way of constructing modifiers from heat resistant materials. You are tied to the mains with this flash and its not as compact as a flashgun, so its going to be ok for a home studio, but not so good on location. Once you start putting modifiers on it the power is going to drop drastically. Would I buy another? I don't know, I think its going to been fun to use in my kitchen for tabletop work. I'm going to have to put it through its paces in a real shoot to see how useful its going to be but considering the low power I cant imagine using it with a snoot as I originally intended.