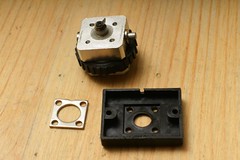
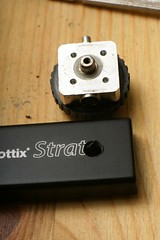
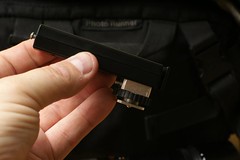
One of the weaknesses of the Phottix Strato triggers is that the shoe isn't a great fit and it doesn't lock, so I decided to use one that needed repairing, to experiment with a case modification. I found that Sonia do an excellent replacement hotshoe for the Vivitar 283/285. It has a PC sync socket and a test button and can be very easily be attached to any case that has room for a hot shoe. The strato trigger doesn't have enough room to replace the hotshoe that it comes with but with a little imagination the hotshoe can be placed on the front of the trigger so that it can be mounted horizontally.
Thats all there is to it. It took me a while to get it done and the dremmel tool made it sound like a trip to the dentists, but it wasn't terribly difficult and I won't suffer any embarrassing connection problems.
Wednesday, 29 July 2009
Strato Trigger Modification
Posted by
Paulo Rodrigues
at
09:00
1 comments
Labels:
DIY,
flash,
flash shutter synchronisation,
gear,
strobist
Saturday, 25 July 2009
My Favourites from Flickr
Flikriver has a rather neat little badge creator that can grab thumbnails from various aspects of your flickr account and make a wee display of them. Ive got enough of my own photos showing here, so I thought I might show you some of the photos that I have marked as favourites. You can click through to see more.
Tuesday, 21 July 2009
Figure Ground Confusion
A while back I wrote about a concept called shared boundaries which causes the perspective of an image to collapse. You can read it here. This concept didn't come to my head unbidden, oh no, I read about it in a awesome but extraordinarily dry book called Perception and Imaging: Photography--A Way of Seeing by Richard Zachia. In fact the cover of the book has a good example of the collapse of perspective.
Another concept from the book is figure ground confusion I touched on this briefly in the previous post. When you look at a picture, you usually quickly establish which part of the picture is the background and which is the foreground, but some images make it hard for the brain to establish this and the foreground and background will flip-flop.
The image above is an example of this. I took it at the gates of the British Library. I have no idea if this works for you, but for me there are three graphical elements working to create a figure ground confusion. The first and most obvious is that the light and shade competes to be the foreground. As I study the picture, the letters grab my attention first because writing is a strong attractor, then the bright spaces between the letters takes over and my perception flips between the two. But the third element that takes over is the pattern of the bricks and this can jump to the foreground and relegate the light and shadow to the background.
Perception and Imaging: Photography--A Way of Seeing is a great book, but I have held off writing a review of it because it is so dry. After I have given it its third reading, maybe I'll write a proper review.
Posted by
Paulo Rodrigues
at
09:00
0
comments
Labels:
books,
Composition,
perception,
photographs,
theory
Thursday, 16 July 2009
Not A Crime
The British Journal of Photography has started a campaign to highlight the erosion of photographer's rights worldwide. They will be collecting thousands of self-portraits of photographers from around the world each holding up a white card with the words, ‘Not a crime’ or ‘I am not a terrorist’.
If you are reading this blog, you are probably a photographer, so what are you waiting for, go put your self-portrait in their Flickr pool. Read More
Tuesday, 14 July 2009
Nikon SB28 Foot Repair
I learn't a valuable lesson at the last London strobist meetup. I was walking around with my flash attached to my monopod and the strain was too much on the plastic foot of the hotshoe and it tore off. I wasn't a happy bunny, but fortunately those chaps at Nikon carry spares for the SB28 flash and within a day I had a brand new plastic part in my hand for less than a tenner. Of course I could have taken lots of photos of the repair process, but I'm a pretty impatient guy and just wanted to get on with it so I didn't document the process. But it turned out to be relatively easy. Seeing as I'm a nice guy I took it all apart again, just so I could show you how to do it.
The tools you'll need are a jeweller's screwdriver and much smaller fingers than me. If you do things in the right order it should be a pretty quick repair.
The first thing you should do is make sure that the locking ring is rotating normally. I didn't do that and ended up having to re-attach the foot so that I could get enough leverage to move the ring. If the ring is locked up you can use a pair of pliers or a wrench to get it moving again. Be careful not to use too much force or you could cause more damage
Once you know what you are doing its a pretty simple repair to make and very inexpensive too. If you need spare parts contact the Nikon Spares department at spareparts@nikon.co.uk
Monday, 13 July 2009
Egg!
I love eggs, boiled, poached, fried, scrambled and most definitely un-fertilised. So when the strobist food assignment came up, I immediately thought of eggs. Actually to tell the truth eggs are really just a condiment to have with bacon. OK I admit it, I actually thought of bacon first, but realised I wouldn't be able to hold off eating it long enough to photograph it. So eggs it had to be.
The funny thing about the strobist competition is that its about lighting but though lighting is very important in food photography, what really stands out is the styling, composition and choice of colours. I looked through my Contact Food and Drink Photographer books to get some inspiration and one of the things that struck me was that the photos that I liked the best had colours that linked the subject and the background. For instance Peter Cassidy on page 28 picks a colour from the subject and uses it in the background. The rust colour in the pears, or the peach stone in the peaches
These contact sourcebooks are full of inspirational photos, and they are free to view online. I had lots of ideas about what I wanted to do but not really enough time. I'd have loved to have done some high end shots like the ones in the books but I didn't really have time, though it has to be said there are lots of very clean simple shots entered into the strobist assignment that didn't take a lot of investment in backgrounds or ingredients.
I don't know when the idea for the eggs came to me. I was vaguely considering shooting a cooked breakast like Laurie Evans' photo for M&S but TBH we don't have lots of photogenic food at home. I'd have had to go shopping. But then the egg idea came to me, and it meant I could just use stuff I had at home.
Styling the egg was quite difficult and required a fair amount of patience, most of the effort went into the styling. Egg yolk is a gel, its semi-solid, So you cant just crack an egg and then move the white into position. You could start cooking the egg and pull the uncooked yolk around, but I felt that it wouldn't look right. So what I did was to separate the egg white from the yolks by tipping the yolk from one half of the shell to the other. Then I took a small paint brush and painted the letters on the tray with egg white. Then I had to carefully spoon more egg white onto the painted portions to thicken it. Egg White likes to stick together, so the spooned egg white flowed around the letters. Once I had built up the thickness, I used the paintbrush to push the white out to round off the letters a little. With this done, the final step was to turn on the heat and place the egg yolks in position.
You have to work quickly once the eggs are cooked because they can quickly dry out. By the next morning they were all curled up. So I didn't spend a great deal of time perfecting the lighting. I would really have liked to have finessed the light a bit better, maybe had bigger highlights on the egg yolks, but it was getting quite late by this point. The cramped conditions would have made it difficult to set up umbrellas and softboxes, so I used white plastic chopping boards and reflected the light off of them. I used two small flashes one pointed at a chopping board behind the tray and the other on the left hand side. I also set up a small piece of foil on the right to add a little fill.
I don't expect this to win the assignment, but its generated a lot of interest. Last time I looked it was sixth on page one of explore, which is kind of nice. It was a lot o fun to do and I would like to do more food photography in the future.
Sunday, 12 July 2009
My Wishlist
I'm going to be turning 40 this year in a month's time. Here are a few photography related books I have on my wishlist. This is for my family and friends who want to get me nice things, but if you want to get me something I wouldn't look you in the mouth :)
Thursday, 9 July 2009
Changing the battery on the Phottix Strato Trigger
If you own one of these triggers (Also known as the YongNuo YN-16), at some point you are going to have to change the battery. This moment came quite quickly for me because the button was accidentally held down in my bag and the trigger was completely dead when it came time to start shooting. Fortunately I always carry a spare so it wasn't a disaster.
Changing the battery however can be a disaster. The reason for this is that there is a component called a bastard spring. If it comes lose you will understand why it is so named. The bastard spring is used by the centre pin of the hot foot and once it pops out of its slot it is very difficult to put it back in without breaking the soldered connection to the circuit board. If that happens, the trigger is going to be junk unless you are very good at soldering.
So I'm going to show you the proper sequence for changing the trigger battery without ruining your trigger.
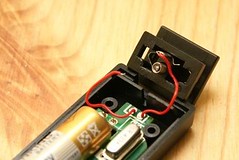
Step Three: Change the battery. If you haven't glued the hot foot to the cover, you need to be careful doing this as it is far too easy for that bastard spring to pop out
There you have it, be very careful and you should have no problems. I'm planning on doing a post at some point on how to modify the trigger so that the test button won't get pressed accidentally. It will probably involve velcro. But you could just leave the test button off completely if you don't use it.
Changing the battery however can be a disaster. The reason for this is that there is a component called a bastard spring. If it comes lose you will understand why it is so named. The bastard spring is used by the centre pin of the hot foot and once it pops out of its slot it is very difficult to put it back in without breaking the soldered connection to the circuit board. If that happens, the trigger is going to be junk unless you are very good at soldering.
So I'm going to show you the proper sequence for changing the trigger battery without ruining your trigger.
Step One: Turn your trigger face down and undo the screws. Carefully remove the screws without pulling the two halves of the trigger apart. |
Step Three: Change the battery. If you haven't glued the hot foot to the cover, you need to be careful doing this as it is far too easy for that bastard spring to pop out
There you have it, be very careful and you should have no problems. I'm planning on doing a post at some point on how to modify the trigger so that the test button won't get pressed accidentally. It will probably involve velcro. But you could just leave the test button off completely if you don't use it.
Posted by
Paulo Rodrigues
at
23:47
1 comments
Labels:
DIY,
flash,
flash shutter synchronisation,
Tips
Thursday, 2 July 2009
Have Some Pride
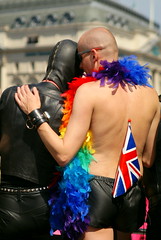
Its The Pride London Parade this weekend. Of all the parades I have photographed over the years Pride London is the highlight of them all. What makes Pride London so special is that everyone there actually wants to be there, and not only that, they want to have a great time. Other parades the people are usually there because they are obeying orders or they are obliged because they got flown out from the states at great expense and now they are in cold grey miserable London when they would rather be back at the hotel snorting coke off a cheerleader's tits.
But at pride, no matter the weather, everyone has a blast. The last time I was there it rained so much that my viewfinder and lenses fogged up and I missed the actual parade while I dried off in a nearby pub. Fortunately I had a press pass and got some good pictures in the pit in front of the stage at Trafalgar Square. The highlight for me one year was when I was able to persuade the leather clad conductor of the open topped Motor Sports Club bus to let me on board and I got the above [insert adjective of choice] image.
Sadly the day clashes with so many other commitments of mine that I haven't been able to go for the last couple of years. So I would like you to go in my place this year and bring me back some pictures. The weather promises to be good this year, so you'll see lots more people. Arrive early at the assembly point in Baker Street and you can get some images of people getting ready for the parade. There are loads of characters, but you might have trouble getting any candids as anyone who sees a camera will immediately play up to it. You strobists can take your gear along and do some portraits, you'll find more receptive people than anywhere else. Take your business cards along too because you might sell some prints.
In previous years the parade route has been quite porous, I saw plenty of people without passes walking the route, so you should be able to slip through and get the odd shot. Try to get a variety of shots not just portraits but wide shots that show a sense of place. Shoot the crowd you should get some great reaction shots and there will be a few interesting characters lining the route.
Let me know how you get on and have fun, fingers crossed for good weather. If you want more information about pride London go look at the website
Subscribe to:
Posts (Atom)