 This is part 2 of how I built a 24cm grid spot for my small hot-shoe flash gun. In part 1, I explained what I wanted to achieve. In this part, I'm going to show you how I turned this tasty bowl of chocolatey goodness, into a lighting modifier for small off-camera flash.
Ingredients:
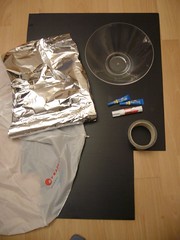
1 M&S Profiterole desert
1 A2 Sheet of black coroplast
1 Roll of Black Duct Tape
1 Sheet of tin-foil
1 Sheet of diffusion material (optional)
1 Strip of sticky backed velcro hooks
Cardboard
The first step is to eat all the profiteroles. You may want to get a grown-up to help you. I would also recomend you have a lie down for a while afterwards.
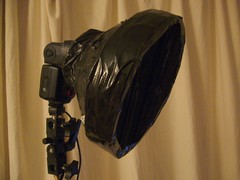
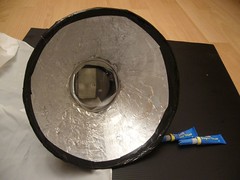 The bowl is transparent, so we are going to shoot through the bottom of it. Because I was hoping the plastic of the bowl would diffuse the light a little all by itself, I decided to wrap tin foil on the outside. I used a 3M Glue stick to stick the foil on, and then coated the outside with black duct tape, with a little overlapping on the inside to hold the tin foil down. Make sure you leave a clear area at the bottom of the bowl for the flash to shine through.
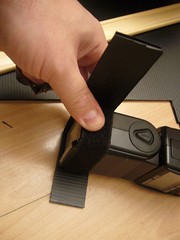 The next step, is to create an attachment for the flashgun. I used some of the coroplast to create an open ended box to attach to the bottom of the gridspot. Unlike Rui over at the Lighting Mods Blog I am very imprecise with my DIY, I didn't measure anything, I just offered up the flashgun to the coroplast and folded it round. To make the coroplast bend you just have to cut through the wall on the outside of the place where you want it to bend and it will give you a nice sharp bend.
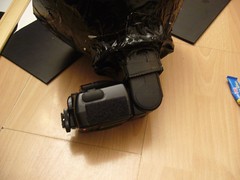 Once the coroplast is cut to size you can put it around the flashgun and tape the loose ends together. Then tape it to the bottom of the bowl, making sure that none of the bowl is visible. At this stage I put some velcro hooks on the inside of the coroplast box at each of the short ends. This made the fit with the flashgun tighter and held it in place. Make one piece of velcro shorter than the other, or you might find it a little difficult to remove the gun once its in place.
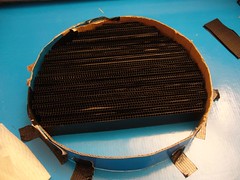 The most tedious part comes next, its creating the actual grid. I traced the outline of the bowl onto some cardboard as a guide and then cut a strip of cardboard about 1.5 inches wide, which I taped on its edge around the circle. I cut 1 inch strips of coroplast to fit inside the circle and glued them together, until I had filled the circle. I used superglue because that what I had available, but it isn't really practical, you would would probably be better off using something that sets a little more slowly. Once the coroplast was all fitted together, I put some duct tape around the cardboard to hold the grid in place. Now the grid has a lip all around it that can be used to fit around the front of the bowl. If its a loose fit, just add more duct tape until it all fits together firmly.
 The proof, they say, is in the pudding, unfortunately I don't have a working digital camera at the moment so I can't show you examples of the results, but I should be getting my new camera in a few days, so wait until part three and I'll show you what it can do.
However I have done some tests with a light meter and test fired to see how well it works.
I placed the flash about 6 foot from the wall at full power. With the grid spot,it produced a fairly well defined circular spot on the wall about 1.5 feet in diameter. I used the built in diffuser on the flash to set the zoom at 18mm
At ISO100 1/400s I get f4.5 in the center f3.5 at the edge. I had thought a little bit of diffusion between the grid and flash would help to sharpen up the edges, but the loss of a stop of light just wan't worth the bother. Next I set the flash to zoom to 85mm, this yielded a spot that was nearer 1 foot in diameter with a much more gradual drop-off. At ISO100 1/400s I got f5.0 in the center
Compared to a small flash grid it doesn't lose all that much light and it gives a much better defined source, which is of course also bigger. I can't wait to try this out when the new camera arrives.
You can click on any picture to see them on Flickr with additional notes


No comments:
Post a Comment